Trying out new programming languages is fun, building Io on Windows is not. The Io language is developed on Mac OS X and it shows. There are no binary builds and you need a fairly standard *nix based system to compile it. Here are the steps to get Io running on Windows (and why you might want to).
update (11/8/2011): If you want to get started right away, there are now up-to-date binaries available so you don’t need to compile anything (although it’s a nice exercise)
If you like to try out new programming languages, there are many options. Io is a language that is certainly different than most of the others. Its prototype nature (everything is an object, no classes) makes you think a little different about many programming issues. And the absence of syntactic sugar is a nice contrast with language such as Ruby.
Unlike many smaller languages, Io can hardly be called experimental at this point. It has been around since 2002 and is in use by a growing group of enthusiasts. The main disadvantage for me was the lack of any kind of Windows support. Now, I absolutely do not hold this against the author (Steve Dekorte). I’m sure he has much better things to do than support whiny Windows users.
So let me show you how you can get started with Io and Windows (Windows 7 in my case). You’ll have a working installation that should at least get you acquainted with the language. My current build isn’t 100% correct. The correctness test failed on deleting directories and I haven’t really researched the reason why. If deleting directories is important to you, you might need to do a little more work to get started.
I’m going to assume you know Windows pretty well (adding stuff to your path, using the command prompt). If you don’t, I don’t think you’ll have much fun trying out Io.
1. Getting the Tools: MinGW and CMake
I initially tried to build with Cygwin. That didn’t work out very well because Cygwin includes a GCC that is terribly old. You could try upgrading the GCC but it looks like people have had mixed experiences with this. And really, why bother, MinGW does have a modern GCC.
For MinGW: follow the getting started instructions. The GUI based installer worked fine for me. Make sure to install GCC and I also added the developer tools (I believe “make” is in there, although I’m not sure). Afterward, add the MinGW bin directory to your path. In my case that was C:\MinGW\bin
Next up is CMake. I didn’t know about this tool, but it looks like something very useful. It worked great for me. I went with the Windows installer that can be found on the downloads page.
2. Getting the IoLanguage source
Now it’s about time to get the source for Io. There are two ways. You can download it from the Io homepage or get it straight from GitHub. You’re getting exactly the same thing, so pick whatever you like.
On my local drive, I created a directory C:\Io. And I put all the source files in C:\Io\sources. Next I also added a C:\Io\build directory where I will be building Io in the next steps.
3. Configure the build
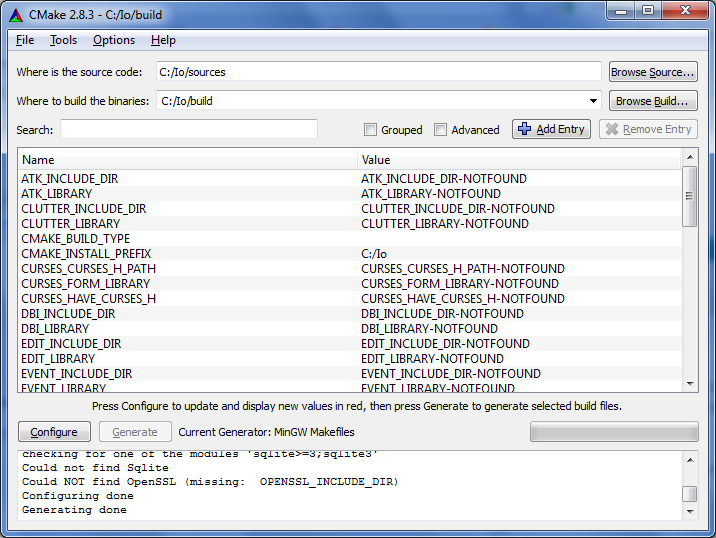
Start the CMake gui, pick C:\Io\sources as your source directory and C:\Io\build as your build dir. Well duh.
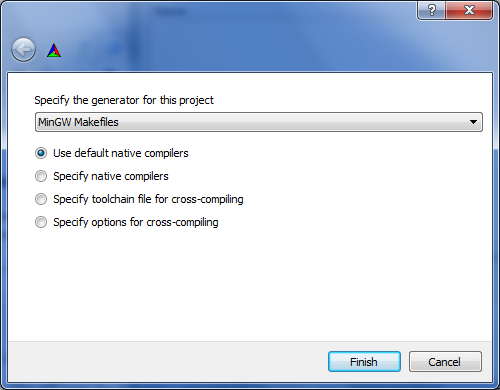
The next step is to click the “configure” button. This will load the makefiles and scan for variables that need to be filled. But first it will ask you which generator to use. Pick MinGW:

This will take some time. But you now should see a long list of name – values. Most of them in red. You’ll notice that many values were not found. I’m going to guess this means this functionality will not work. I’m not yet far enough into my Io experiments to know for sure. So I’ll probably return to this part later on.
I did change one value: the CMAKE_INSTALL_PREFIX. This is where Io will be installed. I changed this to C:/Io
After installation, you’ll have a C:\Io\bin and C:\Io\lib with all binaries installed.
When you’ve changed the install prefix to your liking. Click “configure” a second time.

Now the “Generate” button will be available. If you’re happy with the configuration, click it. This will generate the MinGW build files in C:\Io\build but it will not yet build Io. That’s next.
4. Building Io
This is the good part, it’s also probably the easiest:
- Open a command prompt
- CD into C:\Io\build
- Execute mingw32-make
- Wait
If everything went well, you might see a few warnings, but you’ll have a fully built Io.
Now you can run mingw32-make install to install all the files in C:\Io
5. Finetuning Io for Windows
There are just a few small changes left to make your life easier:
- Add C:\Io\bin to your path
- If you want to run the dynamically linked version of Io, you also need to add C:\Io\lib to your path (I don’t think there’s a difference between the two if you don’t install extra addons)
- In Windows explorer go to C:\Io\sources\libs\iovm\tests\correctness and double click on run.io. Windows will not know how to open the file, so choose “select a program from list”. Next click on Browse and select io.exe. The test should run but will probably give a lot of warnings and (for me) one error when trying to delete the test directories.
- You can also run from the command line: Open a command prompt, cd to C:\Io\sources and run “io libs\iovm\tests\correctness\run.io“. You don’t even need to specify the Io interpreter “libs\iovm\tests\correctness\run.io” works too. Oddly enough, those give me different results, I’m not sure what’s going on there.
Currently the tests give me the following result:
C:\Io\sources>io libs\iovm\tests\correctness\run.io
..E...................................E...............................
......................................................................
.....................
 Exception: error removing file 'testDir/testSubDir'
 ---------
 remove                              Directory.io 143
 Directory remove                     [unlabeled] 0
 List mapInPlace                      [unlabeled] 0
 List map                             DirectoryTest.io 124
 Call relayStopStatus                 A4_Exception.io 24
 Call delegateToMethod                A0_List.io 176
 DirectoryTest tearDown               UnitTest.io 74
 Date secondsToRun                    UnitTest.io 65
 Call relayStopStatus                 Date.io 18
 TestRunner run                       UnitTest.io 113
 DirectoryCollector run               run.io 18
 CLI doFile                           Z_CLI.io 140
 CLI run                              IoState_runCLI() 1
As far as I can interpret the results, this means there are at least two errors with Io core functionality. At least directory removal doesn’t work, I’m unsure what the other error is.
Help needed
Most of my initial experiments seem to work fine on this build, but clearly there are some issues that still need to be resolved. If you have any tips or ideas, please let me know and I’ll keep updating the post until we have a proper Windows build for Io.