In part 1, I set up a Nexus Maven repository. In the second part, I wanted to build a number of Java projects on the OpenShift Jenkins instance. Sounds easy enough, but it wasn’t.
I thought that this was going to be an easy task. How hard can it be to set up a Maven build on Jenkins? I’ve done it tens of times before and it was never more complicated than entering the correct repository URL.
OpenShift has a few roadblocks:
- Because the small gear has limited CPU and memory, builds run on a slave. The OpenShift Jenkins plugin will automatically create build slaves that mirror the server to which you are going to deploy the app. That works fine for web apps that are deployed to OpenShift, but there’s no default slave available for generic Java builds.
- Both Git and Maven prefer to put their configuration and temporary files in the user directory. This folder is not writable on the gears. You are supposed to put everything in app-root/data
- If you run a Jenkins Maven job on a slave, it will try to open a port which it isn’t allowed.
Creating a DIY build slave
The OpenShift plugin will automatically launch new gears when required. It will do this based on the “Application UUID” or “Builder Type” option.
The problem is that there isn’t a preexisting cartridge that has all the options we need for generic Java builds. So you have to create your own one.
[color-box]Step 1: set up a build slave
- Start by creating a do-it-yourself (diy-0.1) application. I named it “build”
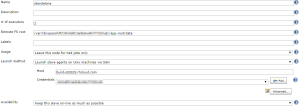
- On your Jenkins application add a slave. Configure it as shown below (click for larger version).
- Verify that the slave is started and connected.[/color-box]
 <figcaption class="wp-caption-text">Things to note: the Remote FS Root should point to the data directory of your slave.</figcaption></figure>
  <figcaption class="wp-caption-text">You need to explicitly set Java and Maven home since this is not part of the DIY config.</figcaption>
Making Git behave
If you want to use git to get your projects from repositories such as Github of Bitbucket, you’ll need to do some tweaking. Git puts its key and known host file in ~/.ssh, however this is not writable.
There is already a cartridge that gets you part of the way there, but it requires an extra tweak.
[color-box]Step 2: configure Git
- Add the OpenShift SSH cartridge by using this URL: https://cartreflect-claytondev.rhcloud.com/reflect?github=smerrill/openshift-community-git-ssh
- Change the git-ssh file in in /usr/bin to the one shown below.
- Add your private key to app-root/data/git-ssh/[/color-box]
#!/bin/bash

KEY="${OPENSHIFT_DATA_DIR}/git-ssh/id_rsa"
KNOWN_HOSTS="${OPENSHIFT_DATA_DIR}/git-ssh/known_hosts"

[ -f $KEY ] && {
  ssh -oStrictHostKeyChecking=no -oUserKnownHostsFile=$KNOWN_HOSTS -i$KEY $@
} || {
  ssh -oStrictHostKeyChecking=no -oUserKnownHostsFile=$KNOWN_HOSTS $@
}
Always use freestyle jobs
It’s finally time to add a first build job. I started with a Maven job, but apparently this doesn’t work. You need to use the free-style project.
[color-box]In Jenkins, create a freestyle project.
- Restrict it to run on your just created slave.
- As a build step, add whatever is required, including an “invoke top-level Maven targets” step.[/color-box]
Custom settings.xml for local repo
If you run that build, you’ll get one final error. Maven puts its local repository in the user folder.
[color-box]The configure the local repository:
- In your job configuration, click on the advanced settings of the Maven step.
- As settings file choose “Settings file in filesystem”
- Enter “$OPENSHIFT_DATA_DIR/.m2/settings.xml”
- In app-root/data/.m2 create the below settings.xml[/color-box]
<settings>
 <localRepository>/var/lib/openshift/<application-id>/app-root/data/.m2/repository</localRepository>
</settings>
That should do it. Next up: deploying build artifacts to our Nexus.