3D for the web, it has been coming to you ever since virtual reality was the mot-du-jour and VRML the format to support, but it’s still not there yet. The latest craze now are Flash 3D engines. There are three worth mentioning: Papervision3D, Away3D and, the one I’ll be talking about here, Sandy3D.
Flash development (or more specificically Action Script) is all fine and dandy, but it does require an investment in some software products. If you’d go the route of least resistance, you need Adobe Creative Suite 3 ($999 for the web standard edition) and some 3D software, Autodesk 3ds Max ($3495 for 2009 edition) is the most widely supported. I don’t know about you, but as a hobbiest that leaves me only 2 options. Pirate the software, or go look in the free and open source community.
Luckely there are a few options for creating Flash and 3D. This post is about the Flash part. FlashDevelop is an open source development environment for Flash Actionscript and integrates seamlessly with the Flex SDK (free from Adobe). As you will see in this post, it is missing the designer features that the CS3 tools have (vector graphics, timeline editing), but as far as Actionscript editing goes, it’s on par with anything out there and better than most.
As an introduction, here is a short tutorial on how to get the Sandy3D getting started video example working on FlashDevelop.
First set up your environment
- If you want to use the latest release of Sandy3D, as we will do in this tutorial, get and install TortoiseSVN.
- Get FlashDevelop (currently 3.0.0 beta 6) and the Adobe Flex SDK. Install both.
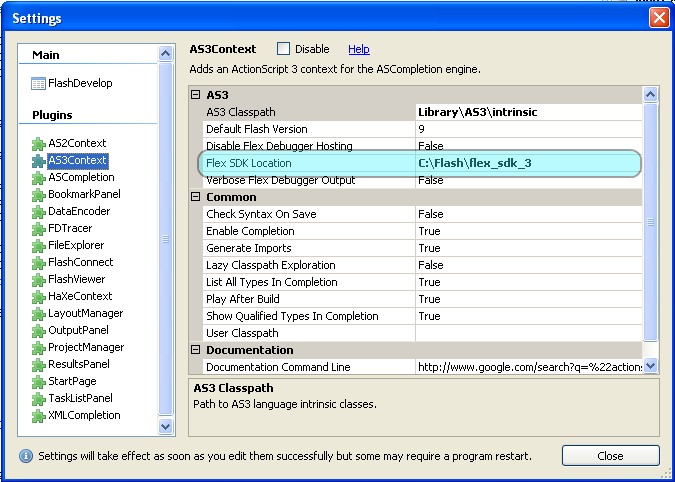
- Start up FlashDevelop and open Tools > Program Settings… Click on AS3Context on the left and fill in the Flex SDK location:
Lets get started
- Watch the getting started video and follow along.
- Create a project directory, eg “New Sandy Project”.
- Inside it, create a “sandy” directory and use TortoiseSVN to check out the latest Sandy3D release, as shown in the video. Use the current release URL here at your own risk (best to follow the video and find the latest release yourself)
- In your project folder, create a Demo1.as file.
- No need to create the Demo1.fla file as this is not used by FlashDevelop.
- Unlike with CS3, you will need to manage your resource library (images, etc) by hand. So create a “library” directory inside your project folder.
- Search two images on the Net and place them in the library directory. One will be used for the background, one will be used as a texture for the plane object we are going to draw.
- Open FlashDevelop and start a new Project: Project > New Project...
- Choose an empty ActionScript3 project. Enter any project name you like. In the location field browse to the project directory you created. Leave the package name empty and click OK.
- Select an output file name in Project > Properties…. For instance “New Sandy Project.swf”.
- In the Project view, open the library directory and right click on both images and select “Add to library“.
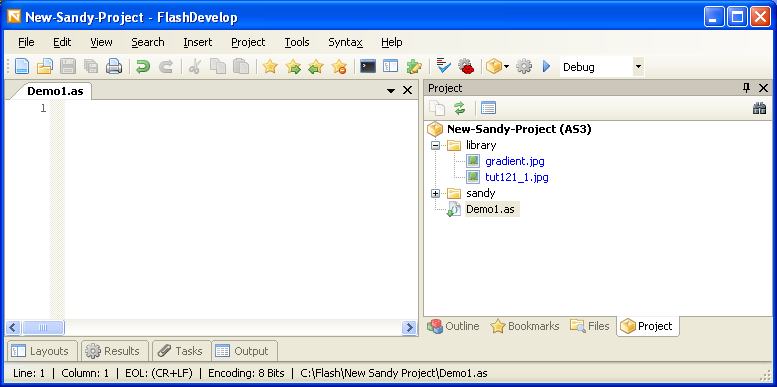
- Again in the Project view, right click on Demo1.as and select “Always compile“. Double click on the file to open it. You should have a view similar to this one:
Enter the code
This one is the bulk of the work. In the Demo1.as view, type the code for the example:
package
{
	import flash.display.Sprite;
	import sandy.core.scenegraph.Camera3D;
	import sandy.core.scenegraph.Group;
	import sandy.core.scenegraph.Shape3D;
	import sandy.core.World3D;
	import sandy.materials.Appearance;
	import sandy.materials.WireFrameMaterial;
	import sandy.primitive.Plane3D;

	public class Demo1 extends Sprite
	{
		private var world:World3D;

		public function Demo1()
		{
			world = World3D.getInstance ();
			world.container = this;

			world.camera = new Camera3D (this.width, this.height);

			var scene:Group = new Group ('scene');
			var shape:Shape3D = new Plane3D ('plane', 100, 100, 10, 10);
			shape.appearance = new Appearance (new WireFrameMaterial ());

			scene.addChild (shape);
			scene.addChild (world.camera);
			world.root = scene;
		}
	}
}
Hit ctrl-enter or select the little play button (test movie). Everything should compile and run fine, but you will see an empty movie. FlashDevelop automatically imports classes for you, so if you typed in everything by hand, like in the video, you could skip the step where you locate the missing import statements.
There are two reasons the code is not displaying anything:
1. The “this” object does not have a width and height. In the demo video a vector image is attached as background. I don’t think this is possible with FlashDevelop only (let me know if it is), so my option is to get a bitmap from the net “gradient.jpg” in this case and use that one. We can do this by embedding an image. Just before the “private var world:World3D;” line, add this:
[Embed(source = 'library/gradient.jpg')]
private var gradient:Class;
And now add this to the main sprite class. Just before “world = …” add
this.addChild (new gradient ());
Run again and you should already see your background.
2. The second issue is that the camera is not pointed in the right direction. Add the code as instructed in the video. Your entire program should now be:
package
{
	import flash.display.Sprite;
	import sandy.core.scenegraph.Camera3D;
	import sandy.core.scenegraph.Group;
	import sandy.core.scenegraph.Shape3D;
	import sandy.core.World3D;
	import sandy.materials.Appearance;
	import sandy.materials.WireFrameMaterial;
	import sandy.primitive.Plane3D;

	public class Demo1 extends Sprite
	{
		[Embed(source = 'library/gradient.jpg')]
		private var gradient:Class;

		private var world:World3D;

		public function Demo1()
		{
			this.addChild (new gradient ());

			world = World3D.getInstance ();
			world.container = this;

			world.camera = new Camera3D (this.width, this.height);

			var scene:Group = new Group ('scene');
			var shape:Shape3D = new Plane3D ('plane', 100, 100, 10, 10);
			shape.appearance = new Appearance (new WireFrameMaterial ());

			scene.addChild (shape);
			scene.addChild (world.camera);
			world.root = scene;

			world.camera.setPosition ( -100, -100, -100);
			world.camera.lookAt (0, 0, 0);
			world.render ();
		}
	}
}
Run the movie again and the plane should be visible.
There’s a little more in the video than that, but that’s for another post. At least you should already be well on your way to running all the other Sandy3D tutorials.